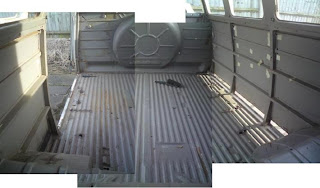
Manufacturing Chassis Supports


Although I haven't been in the garage for a while, I have been able to get into the workshop and fold up a few more parts for the cargo floor chassis. The hardest part of hand forming is getting two parts the same. If your first fold is a little off it can become a big error on the last fold.


I had to cut away the tab that should run along the full length of the top hat section because I would not have been able to fit it into the folding machines jaws. But that's not too bad as this is where the jacking points will be. The others tabs I will fold up when I get the parts to the garage so that I can make sure the fit is correct.


Here's the drawings I made.

A is the I beam
B is the top hat sections
C is the inner sill
D shows the angle for the aft cross section to account for the chassis rails widening.
E is the capping plate for the rear cross section because it has no other pieces below it.


The outrigger I mad a paper template from the measurements taken from the hole left and used this to get the angle of the fold correct.


Chassis Patch Repair

With the extra piece of steel the metal supplier gave me I was able to neatly patch the hole in the left chassis rail.
It's great to be able to weld decent gauge steel without having to worry about distorting it.

Manufacturing cargo floor cross members

All the floor cross members had some sort of rust and rot. I could patch and repair what I need to, but if it's ever going to need replacing I figured now is the best time to go for it. Pricing up all the individual parts varies between £324.50 from Schofield to £483 from Muscle Bus, that price includes jacking points, which I have no intention in trying to make myself.
So I set about measuring up and sourcing the material. My initial quote was £125 uncut sheet, but I managed to find a local supplier who could cut to size and only charge me £50 cash with a small piece of scrap for another repair.
I was going to let you know how to calculate the bend allowance to work out the with of material required for 90 deg bend but in the end I just ended up winging it. I was able to get access to a workshop metal folder but only late in the evening after I had spent a couple of hours setting up the folder and bending a few practice pieces.
The first part to bend was the inner sill, at the time of buying the sheet I decided to use a thicker gauge than that fitted. This caused the problem of bending nearly a metre of 16 swg (1.6mm) thick steel which is very hard. I also forgot to set the grip strength evenly along the folder, this meant the edges rolled up as the material slipped back into the jaws. I had just the right amount of material so could not afford a mistake like this so I left these pieces and moved on to the I beam sections.
Without boring you too much I was up till 04.00 measuring, adjusting,  cutting and bending until my brain stopped working. I managed to get most bits folded and will have to do the box section later. You can see on the left the edge that slipped in the folder, I'll give this a bit of friendly persuasion to get flat.

B pillar repair and inner wheel arch left side

I think the pictures below show what I spent the last two days doing in my garage. Although It wasn't exactly all day, I did get a lie in each morning.
I pulled the rest off the left dog leg/wheel arch off and removed the lower support behind the front jacking point, this revealed the hole in the chassis. I also ground the under seal away to find a few more holes and a couple of patches that had got me through a few MOT's in the past.
For anyone replacing the bulk head panel/back inner arch panel in worse condition that this you may need to notice the tab that protrudes down, (click on the first 2 photos below to enlarge) this rests on the top hat section that sits behind this bulkhead allowing for a small gap along the rest of this edge. Cutting, forming, bending and filing can take up so much time, then welding, grinding and re-welding any holes then take up the rest of the day, giving you just enough time to spray on some primer before bed. Tip of the Day:- the best grinding disc I use is the disc with the small layered sheets of abrasive paper, they are so much easier, faster, smoother and even a little quieter than the conventional metal grinding discs.
I had to put 2 Joggles in the lower patch Id made, the outer was easily made with the Joggle pliers but the inner was too deep for these. I don't have a set of joggle wheels so I placed two similar thickness sheets of steel either side where the form line was required, then held with tape I squashed them in the vice (a fly press would have been better) that had several layers of tape on the teeth to protect marking the panel. The result came out OK, I had to finish the edges with a mallet and block and I should have placed the sheets a little closer together.

Cab Door Hinge Repair

As with most jobs at the moment one job has to be done before the first job can be finished. To repair the lower part of the bulkhead panel behind the front seats, I need the inner skin of the front wheel arch repaired, for that I need to remove the old wheel arch (dog leg) and to do that I need to align the door before the old wheel arch is removed. This leads me onto another job I've been avoiding, fitting the cab door hinge pins. But of course the hinges are cracked on the door skins so they need welding first...

The damage is both inside and out, so a quick clean with a rotary wire brush revealed all the cracks. I then clamped the skin and tacked a few spots, then turned up the welders' power so the welds along the cracks got deep penetration. A quick grind and tidy and job done. Then moving onto fitting the pins I couldn't find the correct size reamer to fit the interference fit for the hinges on the door so that's another job I've had to put on hold.

Cargo Bay Floor Removal Pt2

For the second attempt at attacking the floor I managed finish cutting all the way around and pull it up in one piece, although I did have to cut around the jacking points, and the spot welds under the seat rail plates had me stumped until I had a bit of help from a large chisel. The only things that gave me any trouble was the welding on the previously replaced sills. Although the door side was cut away earlier and also where the heater tubes come through the back of the floor, it was hard to get a cutting disc around most of it, so I chain drilled the tight corners here and the other places around the floor that a cutting disc would not fit.
One mistake I did make was along the front edge was cutting too deep through the floor and into the front support beam that was in reasonable condition. This means I will have to remove this support without damaging the lower edge of the forward bulkhead lower skin that this support is spot welded to. I am not sure how much trouble this will be.
As for the forward and back cut edges where the floor is folded up and spot welded I went round and peeled these remaining strips away by pealing and twisting the metal strips causing the welds to pop away leaving a small raised weld to grind off. This is a lot easier that grinding off the whole strip or drilling each weld but it could distort the good panel which is easy enough to tap straight again, but in the worst case it could rip away the weld so be careful when you do this. The edge of the floor that attaches between the rear wheel arches and the lower part of the forward engine bay fire wall is S shaped and not a simple 90 degree L shape as I thought, so I'll be leaving this part in tacked until I see what the new floor looks like.


Volks World Show 2009 at Sandown Park

Wise words to follow when I dont have to get up early in the morning.

Cargo Bay Floor Removal Pt1

After a lot of contemplation I finally committed to pulling up the whole cargo floor area. This was not a decision taken likely, many hours staring at the rust and the calculating how may repair patches would be needed in that corrugated floor, and how impressed I was with the replacement floors produced from Muscle Bus, finally got me to the decision to attack the many spot welds that pin this floor down. Once I started I knew I had made the right decision. I just hope I don't regret it later. I could have attacked the floor slicing it to pieces with a cutting disc along the edges of the outriggers which would have been fun but I felt I wanted some sort of recovery plan if I did make a huge balls up. So I decided to take the floor up in one piece, this meant removing every single spot weld. Although I had a spot weld drill I found it better to start with a sharp 1/8" drill bit carefully cutting only through the first piece of floor then finishing with a 3/16" that I'd slightly ground the tip flat so that it cut no further than the depth of the first drill bit. I only slipped through both pieces on a few holes and my knees suffered for too long on the ridges of the cargo floor.

Cargo Bay Clear Out

With a few hours to spare I managed to not sit in front of the TV and instead got myself into the garage. Although I wasn't in the mood for getting covered in rust I did manage to get the van out into the sun for a good clearout. That was after I pumped up the rear tyre with a cheap bike pump (not recommended for those with a heart condition). After a struggle drilling off a few rusty screws heads I was able to removed the rear pop outs to unearth some tiny pinhole rust spots in the gutter. I then cleared out the remaining interior, attachments, wires, insulation, gas pipes and old coppers (coins not Policemen) to get a good assessment of the whole cargo bay.
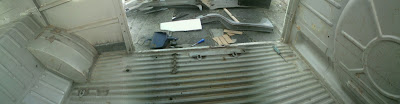
The 4 or 5 holes in the corrugated floor had not got any bigger than the first time I found them years ago, but the struts and floor supports I could see through these holes are looking very corroded. I brought a floor repair panel, but the idea of seam welding corrugation doesn't sound too good and could take a while.

Rear wheel arch and Cargo door latch rod repair

There are a few things I needed to do to get the rear cargo door lower skin to align in its original position and shape, the hole at the front of the left rear wheel arch needed patching up so that I could use the curve of that panel as a datum for the lower door skin. But as always another part needed repairing to get that panel to fit correctly. This could have carried on until I came around full circle, so I stopped at the inner wheel arch patch. The cargo bay floor and jacking mounts will have to wait till later.
Another little job to make sure the skin panels were fitting in the correct location was to repair the door locking rods (these are the rods that fit between both door skins and lock the door at the top and bottom from the central door handles) so the doors would not flap around like they did whilst on a bumpy road. A few beads of weld and a couple of minutes with a grinder and sanding disk sorted the corrosion on the lower part of the two cargo door latching rods. A little bead of weld along the worn parts of the lower latch sockets helped lock the doors in the correct position temporarily.