The van project is still on going but work and exams have taken up a lot of time at the mo, I hope to post more on the project before the new year.PB
OK so its been a busy Christmas as well, so it will be updates in the new year.
 Every day priorities like moving home, exams, barbeques and playing new playstation games have unfortunately put the van's rebuild on the back burner for the last month or so (I just don’t want to miss out on any of the summer sunshine, you never know how long it will last). But I have managed to get the front caliper mounts machined.
  I sent the drawing to a local machine company (Cranford Engineering) that was able to do the machining at a decent price. I chose solid steel as I didn’t fancy trying to calculate the strength and shear properties of aluminium. I was very pleased with the end result, with a clean up, coat of paint, a few new bolts and the front brakes will be ready. Unfortunately I won't be able to test them until the van is rolling.
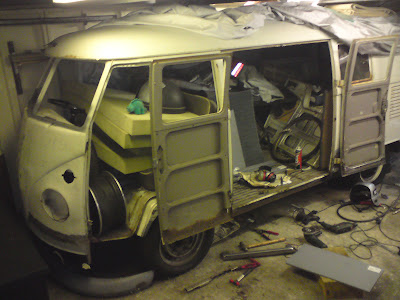
 Haven't had much time to get on with the panel repairs because the restoration has had to be relocated, I was able to find a nice big double garage with power and water, this means I'm now able to work on the side of the van and not just the front and the back. Amazingly, through a door in the back of the garage I found, tucked behind some bushes and an over grown garden a house that also had electricity and running water. My girlfriend was happy to stay there while I get on with the rest of the restoration.
 When I originally found the garage and measured it up for the fit, there was loads of room to work, but it was very close on height. I thought I may be pushing it in and out of the garage with flat tires, or having to start another project of raising the roof, and I don’t think I'll be able to keep a roof rack on for long.


 I've managed to drag myself back to the welding, and attempted to deal with the rust holes behind the cab door seal carrier, and the parts of the floor I've cut out for the A pillar repair.
 It took a few attempts and measuring to fold up a replacement length of seal carrier. Then butt welded this on using the magnets keeping it square while it was tack welded. I cut out a patch for the floor, bending it to suit the curve of the floor as it was tacked into place, this patch was then cut to suit the seal carrier and a seam weld to hold it all in place, all in a long days work, grind it all down and should look as good as new!
 I think I've been a bit sidetracked sorting out the brake conversion instead of getting all the welding completed, probably because it's more fun seeing shiny bits coming together.
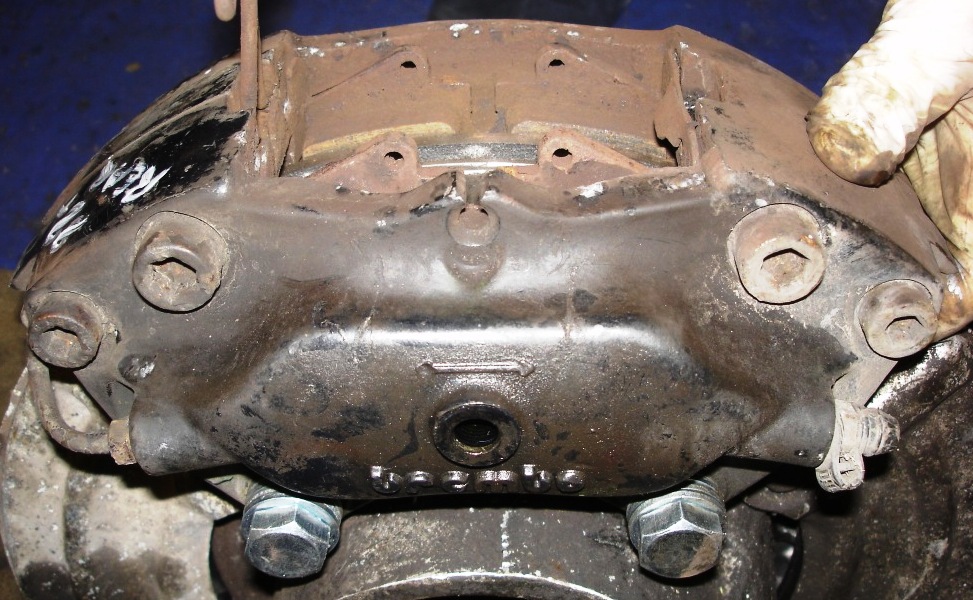

 The caliper is a pretty tight fit in the back off the 15" wheels; there is a slight rub on the wheels' inner shoulder where it rubs on the front caliper face so I'll need a wheel spacer of about 6mm to get the minimal clearance all around. It's not what I wanted to do. But it's something I'll have to live with.
 I popped down to a local Porsche show room in my bug to collect some caliper mounting bolts, after a scan of the 911,s I was greeted by a pretty lady behind a desk asking if I would like any help, explaining why I was there and a phone call later a suited gentlemen arrived with my £6 bag of bolts, a little surprised I paied and started to ask about caliper piston sizes and brake master cylinders, "sorry I don't study the breaks" silenced I decided it was time to leave. You can't beat speaking to a grubby mechanic who knows there way around the cars they work on.
 With new bolts I mounted the front caliper to the wooden bracket I'd made and with the bearing spacers fitted I was able to work out that I needed 11mm offset to centralise the caliper on the disc. I'll now have this bracket machined once I decided the best place to position the caliper around the spindle. Although I'm still unsure if I should use my link pin or ball joint spindles and beam.
 The vision of a shiney Fusch wheels and polished callipers isn’t as easy to pull off as “oh you need some 944 hubs to do that” Its hard to get the right parts when you don’t know the model and year of the car, you cant just ask for a rear disc with about this much diameter and the depth to fit the rusty hub you plonk on the counter, But the bloke at the parts shop was intrigued with what I was trying to do and was very helpful pulling parts off the shelf’s till I found what I thought would fit.
 I like (more stare at each time I see one) the 996 / Boxster style of Porsche mono block (all once piece) callipers but these are for 320ish mm diameter discs to fit 16”+ wheels and would be to much trouble to fit in my 15”ers So the power of eBay drew me into it's grasp for a month while I tried to obtain a set of 944/924 Brembo callipers for a fair price (Inc postage). Of course the description is not always accurate. What I received needed a full check up. this included freeing a couple of pistons new dust seals and some corrosion treatment.
 During my clean up and inspection it became apparent I'll have to sort a few things out. There was corrosion around one off the pistons holes that will need blasting to remove it and that piston was seized, this was because of corrosion on the surface. I found out after I levered it out that there’s a removal tool that probably makes the job a lot easier. Also the piston sizes weren’t matching and the rotation arrow was the same. Each calliper is manufactured with two different size pistons, the smaller of the two at the leading edge. I ended up with a pair of 36mm-40mm that Ill use for the front but have a right hand 32mm-36mm and a right hand 30mm-34mm. This is the problem of doing things on a budget, you get what you pay for. I'll look for something better later but for now they will help me get everything fitted OK.
 Fitting the calipers’ to the rear 924 swing arms should be a bit easier than messing around with bearing spacers. With new discs trialed on and the calipers pads centered on these, I’m able to work out the spacing between the original caliper attaching threads on the rear swing arms and the calipers. If I sit the caliper so the pads are on the center of the disc it foul's the disc on the lower part of the caliper, and because the rear hubs came with out rotor attaching parts (two counter sunk disc fixing screws) Ill need to sources these to get the disc fixed securely so that the measurements I need to adjust the caliper are correct.
 If I fit the caliper to the original mounting threads on the rear swing arm the pads over lap the disc. The easiest way to solve this is hope there a wider disc with the same offset for the hand brake drum assembly. I think the Brembro calipers are fitted to turbo 944 so that could be an option, although that may mean a bigger disc off set for larger turbo style wheels. I'll have to have a chat with the parts shop again and see if they have any thing that will help.
 Grabbing a few spare bit of pallet wood I knocked up a front caliper mounting bracket this gives me a visual idea of the calculations and drawings I've been spreading around the garage on each piece of scrap paper I could find, With a bit of fine tuning. I'd like to get this part CNC (Computer Numerical Control) machined at a local shop, but if its to expensive Ill make it from plate steel and weld on and tap the spacers/ mounting holes. All of this and I still need to work out how to pressurise this lot? I'm sure the original single circuit master cylinder wont be up for it!
 Well back to the job of repairing the front valance again. I’ve been going back and forth to this job for too long now and I decided to post the work once compleated..... ish. With the joining brackets fabricated I set up my new 160 amp welder to fit these on. Wow how much easier it is to weld with decent kit (although I’m still not perfect), the small old hobby welder I’ve been suffering with will defiantly get the boot. The bracket was tacked on with ease and the lower flange I decided to bend to the profile of the closure panel when its trial fitted.
 I drilled and tacked some nuts inside the valance for attaching the cab floor belly panel because unfortunately this panel didn’t have the forming for these, I then trialled the valance front closure panel using the lines drawn on tape Id marked as a datum long; long ago. With a bit of forming at the ends and re-measuring, the panel went on with no problem. I tacked the lower part from the inside the valance and discovered the joys of welding upside down. The welding burns are a lesson learnt, and it could get hot and sweaty stuck in a garage with all that protective gear now the summers coming.

 I received the new lower front panel (which I specially requested without the cut out for the nose and longer at the ends so I can fold it over like the original.) Rather than butt weld this panel I joggled a small lip on the repair panel to sit inside the original one. I ground a ton of filler off the front panel so I could ensure the repair panel was straight, although a bit tricky around the nose; using some fabricating magnets and clamps the panel fitted OK.

 Eager to get the panel on I started tacking it together, then double checking the fit before I went welding crazy I noticed that the joggle at the left corner end of the panel was overlapping to much, and causing the curve of the panels not to sit flush. Access to the back of this panel is very awkward because of the front light bowl and inner kick panel, this ruled out any fabrication from the back. So I painstakingly cut the joggle off from the front with a cut down junior hacksaw clamped in a pair of pliers. This did the job of letting the pannels sit flush, and then with the magnets in place I continued to tack it all together.
 Learning from my cock up with warping the dog leg panel I spaced out the weld points and spot welded the a seam between the two panels with only a second spent on each weld, but still the original part of the panel had a slight ripple along its curve. Not sure if I’m being to particular about my work or still have a lot to learn but I'm determined to get it right. So I guess Ill rely on the paint prep to get rid of any imperfections (filler).


 So that when I weld the wheel arches in place I get a true line to compare against the door bottoms I’m replacing all 4 front door hinge pins. The doors had only dropped a little from the 40 years of wear, but this movement transferred to the end of the door meant the door bottom scrapped on the arch when you closed it. One of the mirror stalks from the top hinge was welded to the top. This was a quick fix to stop the wear getting to bad, but means I needed to carefully cut off the stalk and grind off the weld to free up the top of the pin. I first tried to squeeze the pins out with a G clamp and small socket hopping the pins would be louse enough to pop out. But quickly gave up to getting the flame thrower out. I’ve been reluctant to attempt this job because of the fear of it turning into a nightmare and ending up damaging the hinges or even worse the doors.
 With a fire extinguisher and bottle of water close by and some help from a friend we got the plumbers torch lit and started heating up each hinge. I concentrated the point of the flame only on the upper and lower parts of the hinge as these are the parts that secure the hinge pin in place. After about 3-4 minutes of heat applied evenly on both sides top and bottom, we rested the hinge against a vice and persuaded/eased/whacked the pin out from the lower side. For the first attempt I wasn’t properly prepared, I bent my first punch and lost the heat only getting the pin out half way, The next attempts using a cut down allen key were surprisingly easy, with the pins sliding out and we managed not to scald the doors or burn down the garage.
 The next task is to replace the pins and do some thing about the cracks around the hinge rivets. The new upper replacement door mirror arms are 8.5 mm over size, and the lowers are 8mm. my first mistake is presuming the lower pins wont be that worn. The new lower pins slid straight into the hinges and wobbled, so I'll have to replace the 8mm’s to 8.5’s. This had held me up till I can replace these.
 Now with replacement 8.5mm bottom pins and access to a pillar drill I was able to ream the hinges to a tolerance fit.
  This was done with an adjustable reamer, not my first choice but because I was messed about getting the correct size originally this got me through. Adjustable reamers are not the most accurate to use, it took a bit of trial and error to get the exact fit I required, and each pin had a very slight size variation and tapper that effected a tolerance fit.
 Helpfully link below from Vdub engineering
 There’s been plenty of bolt on products and fitting kits on the market since then. Some are good quality, some well over priced and others not quite the look I’m after. I’ve decided to try and save a bit of money by getting good quality parts by sourcing all my own, this will mean hunting for the bits I think Ill need and a few modifications here and there. I hope my discoveries will help anybody else trying to fit Porsche brakes.

 After reading a few split screen van club forum discussions and a few tips from members, I’ve started by getting hold of a set of front and back Porsche 944 hubs (non turbo) and rear swing arms. This will allow me the choice off aluminium arms or the VW type 3 set up I have had laying in my garage. But that decisions for later.

